
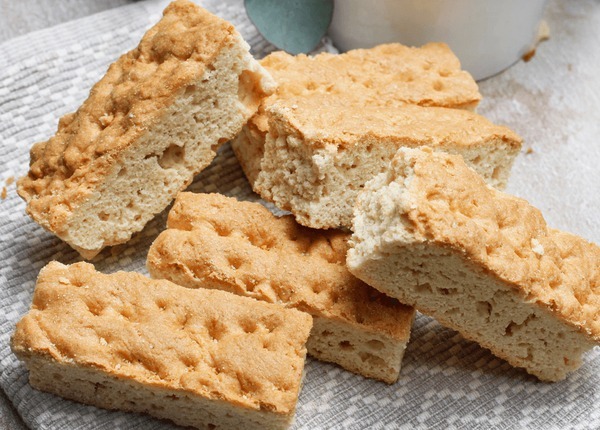
If you love buttermilk rusks by woollies then you’re going to love my take on the buttermilk rusks Woolworths recipe.
A beloved treat from South Africa, buttermilk rusks are frequently eaten for breakfast or as a snack. These crunchy, twice-baked biscuits are a favorite for lazy mornings or chilly afternoons since they’re ideal for dipping into coffee or tea.
Rusks are more than just a snack in South Africa; they have cultural importance and are frequently connected to get-togethers and customs with family. Buttermilk rusks are a cozy and comforting treat for any occasion, whether you’re sharing them with company or eating them at home.
Ingredients
To make these delicious buttermilk rusks, gather the following ingredients:
Flour: 700 g of cake flour, sifted
Bicarbonate of Soda: 1/2 teaspoon
Salt: 1/4 teaspoon
Sugar: 2 tablespoons of white sugar
Dry Yeast: 20 g (equivalent to two sachets)
Butter: 6 tablespoons of unsalted butter, melted
Buttermilk: 750 ml (or you can use amasi)
Eggs: 2 large eggs
Buttermilk Rusks Woolworths Recipe
Preparation
Set your oven’s temperature to 180°C (350°F) to start. This guarantees that the rusks bake uniformly and turn golden.
Mix the sugar, bicarbonate of soda, salt, and sifted cake flour in a large mixing bowl. The leavening agents will be more evenly distributed throughout the batter if these dry ingredients are thoroughly mixed.
Next, heat the unsalted butter in a another basin. Let it cool a little before incorporating it into the dry mixture. This is important since adding the eggs straight into hot butter could cook them.
Beat the eggs and buttermilk together thoroughly in a separate basin. The buttermilk contributes to the soft texture of the rusks in addition to adding flavor.
Stirring until just blended, gradually add the wet mixture to the dry ingredients. To achieve a lighter texture, you want to keep some air in the mixture, so take care not to overmix.
After combining, add the dried yeast to the mixture and gently fold it in. During baking, the yeast will contribute to the rusks’ lightness.
Shaping and Baking
After transferring the dough to a surface dusted with flour, shape it into a broad rectangle that is about 2 cm thick. Squares and rectangles of dough should be cut with a sharp knife or pizza cutter. It will be simpler to break apart after baking if this is done.
After cutting, arrange the pieces on a baking tray covered with parchment paper. Because they will expand while baking, make sure they are somewhat apart.
Bake for 25 to 30 minutes, or until the tops are golden brown, in an oven that has been warmed. When finished, the rusks should be firm to the touch.
After baking, take them out of the oven and let them cool gently on a cooling rack. Once they have cooled for around ten minutes, split them apart using the previously made incisions.
Second Bake for Crunchiness
Replace the shattered pieces in the oven at a lower temperature of 100°C (212°F) to get the signature crunch that rusks are recognized for. Give them one more hour in the oven. They become crunchy and dry during this process, making them ideal for dipping!
Once the hour has passed, switch off the oven and allow the rusks to cool completely within. This aids in their continued hardening without burning.
See also: Woolworths curry noodle salad recipe
Flavor Variations
Even if classic buttermilk rusks are delicious on their own, you can improve your baking skills by experimenting with other flavors:
Nutcrackery Pleasure
Add chopped nuts for extra crunch and flavor, like pecans or almonds. You can intensify their nuttiness by briefly toasting them before adding.
Sweet Twist
Add dried fruits to your dough, such as apricots or cranberries, to give each bite a blast of sweetness.
Added Flavor
For warmth and depth, try adding spices like nutmeg or cinnamon. For added flavor, you can add a teaspoon of vanilla extract to your rusks.
Savoring Your Buttermilk Rusks
Your buttermilk rusks are ready to eat once they have totally cooled! If they live that long, they can be kept for several weeks in an airtight container! Enjoy them as a lovely treat any time of day with your favorite hot beverage.
Rusks made with buttermilk go nicely with a variety of dips as well. For a decadent touch, try pairing them with chocolate dips or cream cheese spreads. They also make wonderful gifts; just wrap them up in pretty jars or boxes and give them to loved ones who value homemade treats.
Why are my rusks so crumbly?
A major contributing factor to rusks becoming crumbly is insufficient binding components. Eggs and buttermilk are essential for binding the ingredients in traditional recipes. Lowering the quantity of eggs or buttermilk could cause the rusks to become less cohesive after baking. Make sure you follow the recipe’s instructions for the exact amounts to use.
Although it’s crucial to fully mix your ingredients, overmixing might result in rusks that are crumbly and tough. Overmixing flour can cause gluten to form, which can alter the texture of your baked items. In order to keep the crumb soft, mix only until incorporated.
Your rusks’ texture may also be impacted by the kind of flour you choose. For a softer texture, cake flour or all-purpose flour should be used. Rusks made with whole wheat flour or a high-protein flour could be crumblier and denser. For optimal results, use the flour type that is advised.
The final texture of your rusks can also be affected by how you cut them before the second baking. When handled, they could crumble more readily if you cut them too small or unevenly. To achieve consistent drying, score them thoroughly before baking and cut them into uniform pieces.
Your rusks may retain moisture and crumble when chilled if they are not dried out enough during the second bake. Make sure to dry them at a low temperature (around 100°C or 212°F) for a sufficient period of time (about one to two hours) until they are crispy and totally dry. To have a firmer texture, you might want to bake them for a longer period of time.
In summary
Buttermilk rusks Woolworths recipe are a staple of South African culture and history, not merely a tasty snack. Enjoy this tasty treat right out of the oven when you make them at home. This recipe, with its straightforward ingredients and uncomplicated methods, is ideal for both inexperienced and seasoned bakers.